Painting Travel Trailer Cabinets and Trim
I had wanted to brighten up my travel trailer by painting all the dark wood a lighter off-white color, but have to admit I found it a daunting task to contemplate. Since I’m a full-time RVer, how was I going to paint it while I’m living, cooking, sleeping in the space? I completed this project while volunteering at a wildlife refuge outside Portland, OR.
Paint and Primer Used
 I wanted a low VOC paint. I had used Benjamin Moore Advance Waterbourne Interior Alkyd Paint Satin 792 paint and Advance Waterborne Interior Alkyd Primer (790) in two houses and had great results repainting wood cabinets and knew both gave off very little smell. On the recommendation of a Benjamin Moore store I decided use Stix Waterborne Bonding Primer because my trailer has wood cabinet doors, but everything else is MDF covered with wood looking paper and the guy at the store said Stix is a great primer that can even be used on laminate.
 I once again loved using the Benjamin Moore paint and the resulting finish. I don’t think I’ll ever use Stix again. The gallon of primer became thick and hard to work with and developed flecks that didn’t sand off. (I have since found out that Benjamin Moore makes Fresh Start® High-Hiding All Purpose Primer (046) that works on laminates.)
Benjamin Moore has a nice write up on how to paint cabinets: https://www.benjaminmoore.com/en-us/contractors/tips-and-solutions/painting-cabinets
Color Choice
I was afraid a stark white wouldn’t look good with the wallpaper (not planning to paint the walls), the off white ceiling color, the wood look vinyl flooring, my rugs, the fabric on the furniture, and the curtains I made since they were all browns and tans. I got Benjamin Moore Vanilla Ice Cream OC-90 and the paint literally looked like melted vanilla ice cream in the gallon can. It’s still a very bright color, but it coordinates well with all the browns in my trailer. When you look at the cabinets you think they’re really white until you put something snow white next to them. I love the color.
Painting
It took me a while to screw up my nerve to start. I began in the bathroom since I figured I could only do that room if I thought it was a mistake. Of course, I loved the brightness of the new paint. The bathroom is now so much more pleasant.
The non-wood parts, which was everything accept the cabinet doors and drawer fronts had fake wood grain paper so when painted they have no wood grain at all. I have some huge expanses of fake wood (bottom of murphy bed, dinette benchs, bunk bed area) and had to be careful rolling the paint and primer to get a smooth finish.
I liked the new color in the bathroom, but making that first brush stroke in the living area of the trailer was hard since there would be no turning back.
Problems
In general the sheer awkwardness of painting tight areas was a constant problem. My bathroom has a rounded wall so painting the tall cabinet on the bathroom side and then the bunk area on the outside was a pain to reach that sharply angled area. I used lots and lots of painters tape in three different widths.
I removed all the hardware I could, but some just wouldn’t budge and I had to work around it.
 Caulk – The 100% silicone caulk used throughout the trailer proved to be my nemesis. I tried solvent after solvent in hidden areas and it removed the paper from MDF, removed the wallpaper from the wall, removed the paper from the ceiling. I tried heat with the same result. What they didn’t remove was the caulk. The job ended up being predominantly a manual removal and then De-Solv-It Contractors’ Solvent helped remove the residue with no fumes and no need for a hazmat suit. Every little speck of caulk had to be removed because neither the paint nor primer would slick to it. I could have primed and painted all day. I hated the caulk removal.
 Replacement Caulk Color – The only colors of caulk available at big box stores are clear, white, almond, beige, and brown. They didn’t match my Vanilla Ice Cream and I did not want to ruin my paint job with a mismatched caulk. I stopped at a Sherwin Williams store nearby and a very nice sales person talked to me about caulk. He figured the manufacturer used 100% silicone because of it’s extreme flexibility for movement. The had PowerHouse Siliconized Acrylic Latex Sealant in a perfect Dover White color to match my paint. I don’t know how it’s going to hold up with the twisting and movement when the trailer is on the road, but the color match is perfect.
Lack of work surface for painting doors – Since the only work surface in the trailer was my dinette table I could only do small sections at a time. Only 2 doors would fit on the table to be painted. With 28 doors and 6 drawers, that meant a long, long time. Since I was volunteering at a wildlife refuge 3 days a weeks I had 4 days to paint. Doing two coats of primer and two coats of paint to cover the dark wood took all four days off with the drying time to do a small section that included 2 doors. The project would take a minimum of 14 weeks. I started on October 24, 2018 and finished on January 18, 2019. I didn’t volunteer for 2 weeks due to the government shut down so I painted every day and that made it possible for me to finish in 12 weeks. Three months — sheesh.

Screws with plastic caps – I started to remove these long screws and decided not to since they make hold something critical. I popped off the caps and painted around the cap holders. I have yet to spray paint the caps and replace them because I have no place to paint them and it’s raining all the time in Oregon. I have the paint and may not get them done until I’m in Yellowstone for the summer.

TV – I tried over and over to get the TV off the bracket. I’d read more in the internet and try again. It would not lift off. I occurred to me I was spending more time trying than it would take to paint behind it so I wrapped the TV and cable in Glad Press’n Seal. Press’n Seal is one of my favorite paint tools and have used it for years. I wrap rollers and brushed in it between paint coats, a wrap the roller pan so I can just throw out the Press’n Seal and have a clean pan. I wrap things that can’t be removed easily like the TV here. Go to the bottom of the post to see ways I use dPress’n Seal.
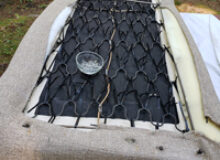
Dinette – I hated the padded ends on the dinette seats. I removed them and found they covered a whole lot of ugly. I went to Home Depot and purchased lattice and screen molding. I cut the pieces to length with their tools. It cost around $2. I glued the pieces in place before painting the dinette. After paint and primer they now look like the benches were built that way. I love it. You can see the difference in the before and after pictures below.
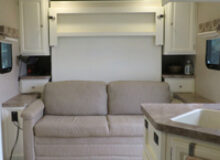
Murphy bed and Jackknife Couch – Both were very difficult to paint around since I couldn’t remove them. Again — lots of tape and Press’n seal. The gas shocks that raise and low the bed couldn’t come off so I wrapped them in Press’n Seal. There were areas that were very hard to reach. I did the best I could. It’s not perfect. I’m fine with that.

Plastic Trim on Kitchen Cabinet End – I had read online that this trim can be a problem when paint chips off. I knew I couldn’t find off white replacement trim so I sanded, primed, and painted it. The only thing I hit it with is my head and so far no chipping.
Microwave – I needed to be able to use it while painted so I removed the screws, slid it out an inch, and taped the edges. It worked out great. When the paint was dry I just slid it back in place and replaced the screws.

Hood over Stove Top – I didn’t want to remove the hood since it would be hard for me to hold it up to replace it alone. I back the screws out so there was about 1/4 inch between the cabinet and hood. Taped and put Press’n Seal on the hood and painted around it. Again, just tightened the screw up when the paint was dry and the tape and Press’n Seal was removed.
Refrigerator – I was worried about the doors. I had read where people had to remove the doors to paint the inserts. The may be true if your refrigerator has cabinet door fronts, but mine had 1/8 inch luan plywood inserts. The freezer door was easy — I took off the lower door trim and slid it down and out. I took the top trim off the refrigerator door and flexed the luan plywood enough to get it out of the frame. Did the same after it was painted — flexed the plywood and back into the frame and popped the trim back in. I taped the living daylights out of the refrigerator edges since the outside trim didn’t want to pop off easily. It turned out great after the tape was removed.
Clean Paint Line Along Vinyl Flooring – I taped the floor along the cabinets and used a putty knife to press it firms into the floor. I still had a little paint run into the wood grain in a few places. I have used a pick to get the runs out and now it looks great.
3 Months of Living with a Constant Mess – I don’t know what I like more now that I’m done. The paint color or the cleaned up trailer. I got very tired of everything being torn up for so long. Glad it’s over.
Sharp Corners – I have sharp 90 degree corners on some of my cabinets where the paint would chip easily, especially if bumped by the vacuum. I purchased a 4 foot length of clear self-stick corner protector from Home Depot. I cut 6 inch pieces and have place them on those corners at the floor. Now I don’t have to worry about it and I don’t even notice them.
The best way to paint an RV is obviously when you’re not living in it. It can be done while living in it, but it’s difficult. I’ve never been bashful about tackling hard projects, but this was once of the worst. I told a friend the next time I come up with an idea to just take me out and shoot me since that would be a lot less painful. It’s been a while since I finished and I can’t tell what I love most. That it’s not messy anymore or the paint color. My trailer has gone from what felt like a dark cave to a bright space.
Before on left and after pictures on right
Other After Pictures
Ways I used Press’n Seal


